Blog

  • How to Stand Up Straight ? : Guide to Improving Posture

    How to Stand Up Straight ? : Guide to Improving Posture

    In today’s digital age, where we spend most of our time sitting in front of screens, learning how to stand up straight has become essential for maintaining good health. Poor posture can lead to chronic pain, anxiety, and musculoskeletal issues. On the flip side, standing up straight brings numerous benefits, including increased confidence, better breathing, and more energy. In this comprehensive guide, we will explore how to stand up straight by incorporating practical exercises and routines into your daily life.

    1.  Why Is Standing Up Straight Important?

    Before diving into how to stand up straight, it’s crucial to understand the significance of maintaining proper posture. Good posture helps your body align correctly, reducing the strain on your muscles and ligaments when you move or lift. Without it, you may suffer from::

    • Chronic back pain
    • Headaches
    • Fatigue
    • Joint Deterioration.

    Practicing proper posture not only helps to avoid these issues, but it also enhances your physical look and confidence.

    2. The Benefits of Standing Straight

    • Supports Musculoskeletal Wellness: Proper alignment relieves tension on muscles and joints, lowering the likelihood of injury.
    • Improves Lung Functions: Standing straight allows the lungs to expand without restriction, which leads to increased oxygen intake and more energy.
    • Enhances Circulation: Correct posture promotes blood flow, which is critical to general health and dynamism.
    • Increases Confidence: The way a person positions their body can influence both their own and other people’s views. Standing up straight demonstrates confidence and aggressiveness.

    3. How to Check Your Posture
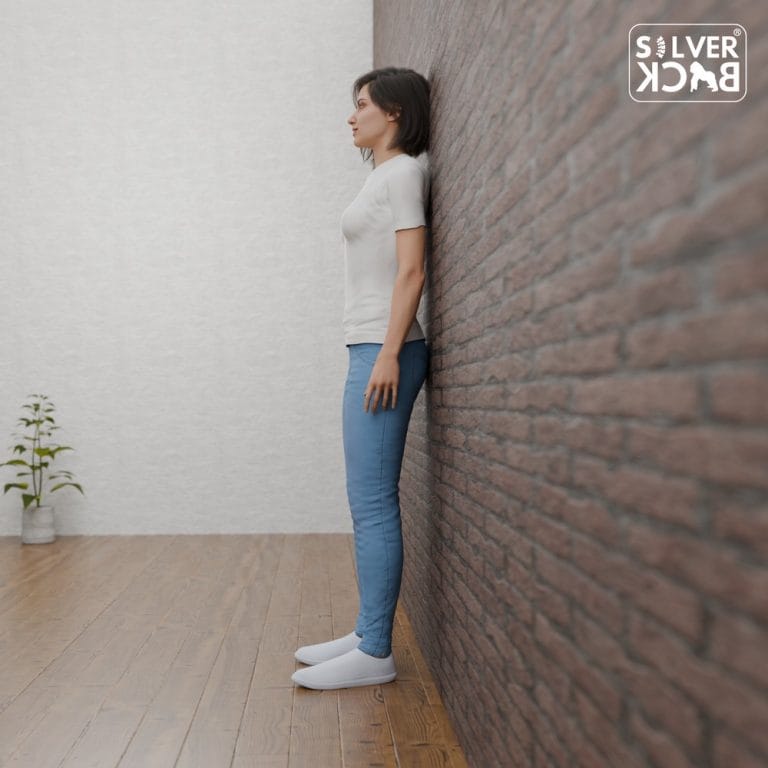
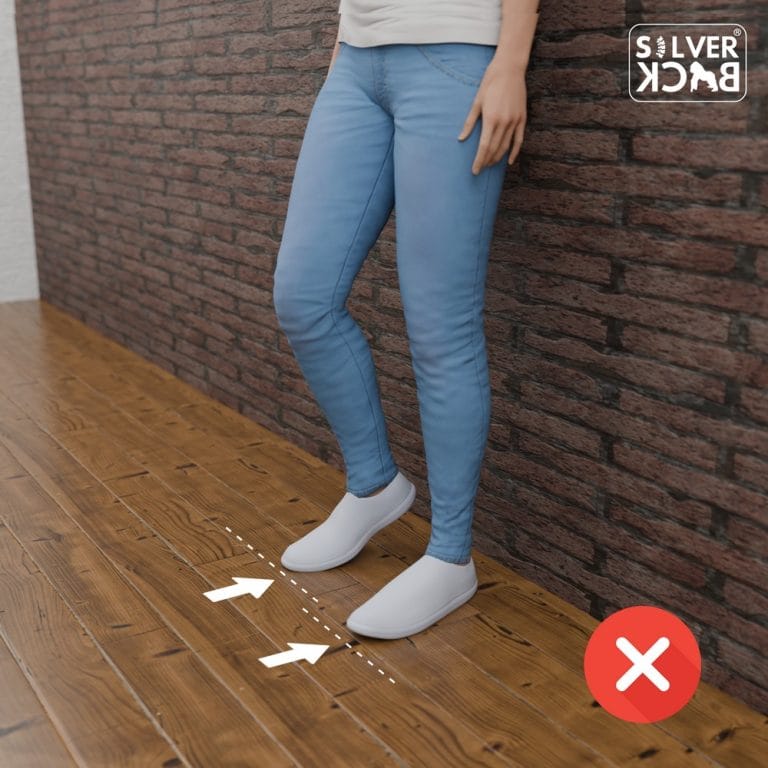
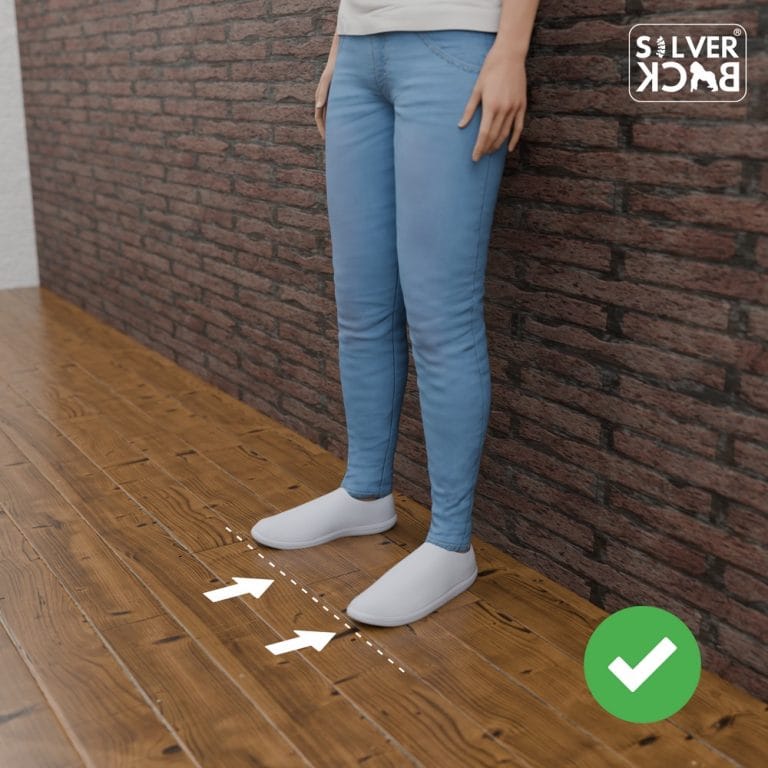
    Step 1: Wall Test.

    To get started, we will employ a basic yet efficient procedure known as the Wall Test. This practice provides rapid feedback on your present posture and acts as a benchmark for development.

    Steps and Directions:

    A. Locate a Flat Wall:

    Locate an empty wall in the house or business that is easy to stand against.

    B. Place Yourself:

    Stand with your back against the wall, making sure the following regions are in contact:

    • Head – Upper back.
    • Lower back (tailbone).
    • Heels.

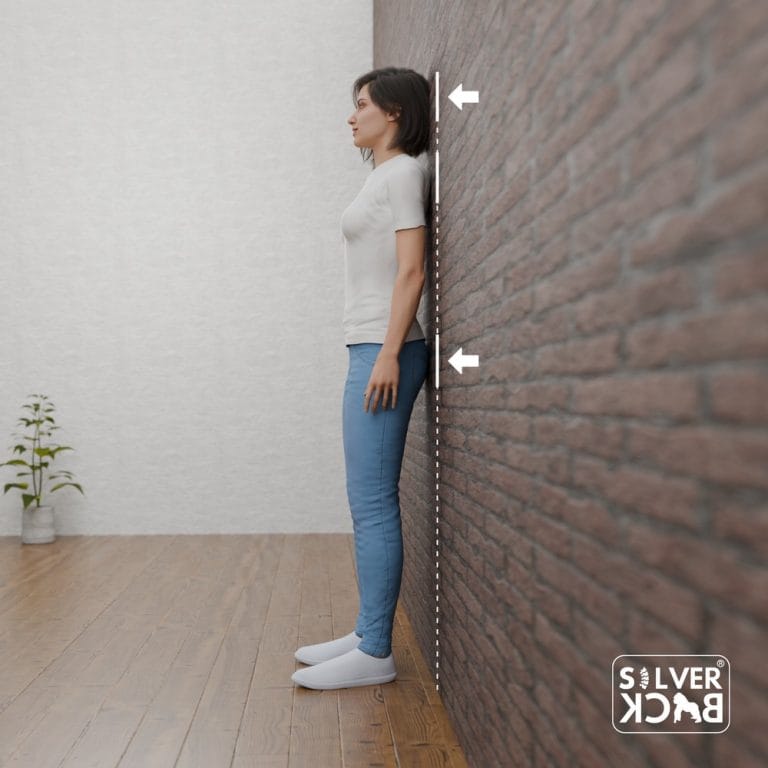
    C. Pay attention to the Points of contact:

    – Determine which body parts makes touch with the wall. A large space between your lower back and the wall suggests severe bending (hyperlordosis).
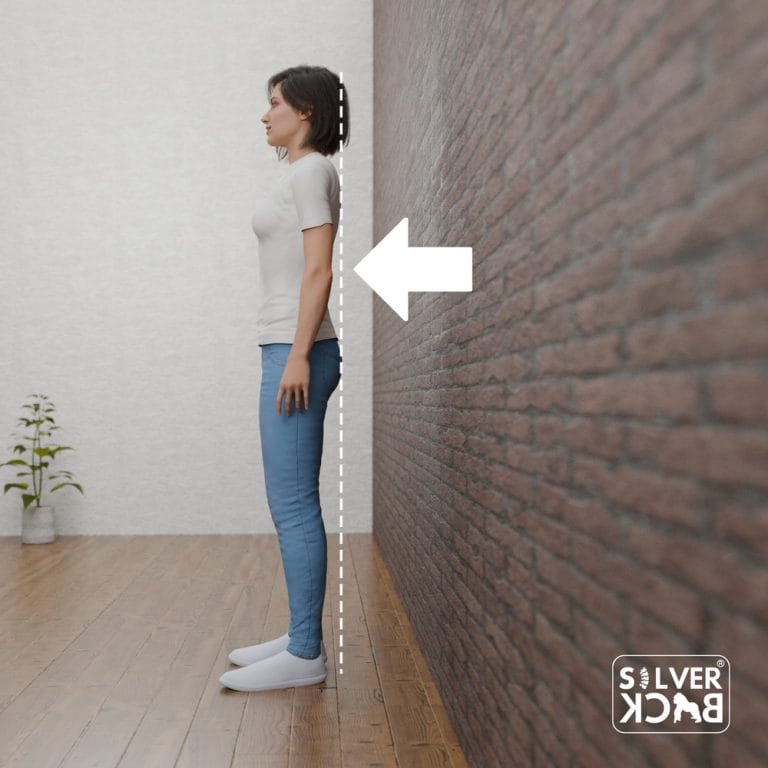
    D. Move Away:

    Carefully move away from the wall while remaining in this position.

    E. Hold Your Position:

    Stand straight in your new position. Your ears must be aligned with your shoulders, which must be relaxed and back.

    Step 2: How to Stand Up Straight: Key Posture Checkpoints

    After performing the Wall Test, it’s important to remember certain checkpoints to maintain how to stand up straight throughout the day:

    A. Head Position:

    Keep your chin level, not inclined up high or tucked in. Imagine a cord dragging the top of your head higher.

    B. Spine Alignment:

    Your spine should retain its original curvature. This indicates a little inward bend in the lower back and a little outwards curve in the upper back.

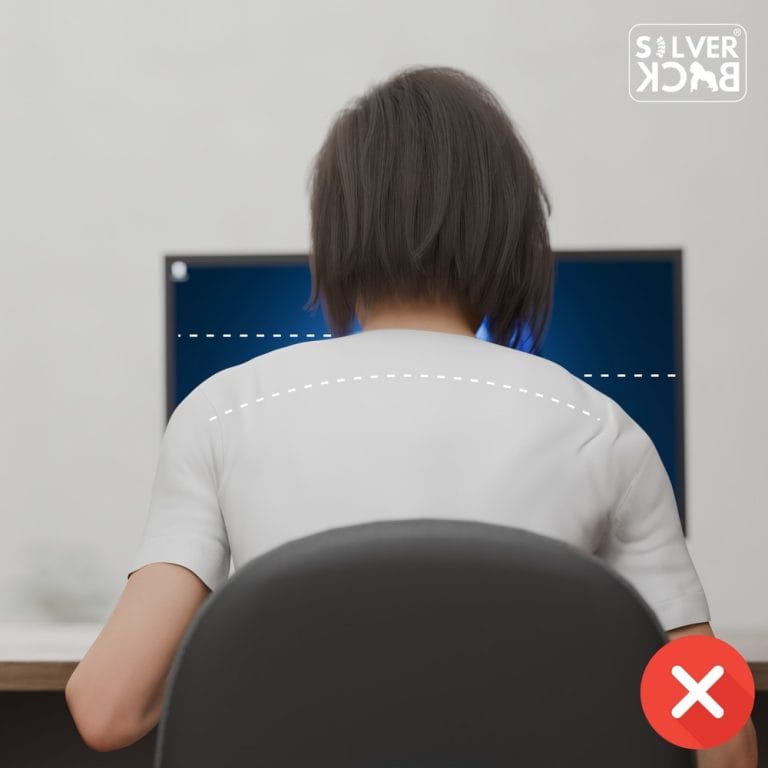
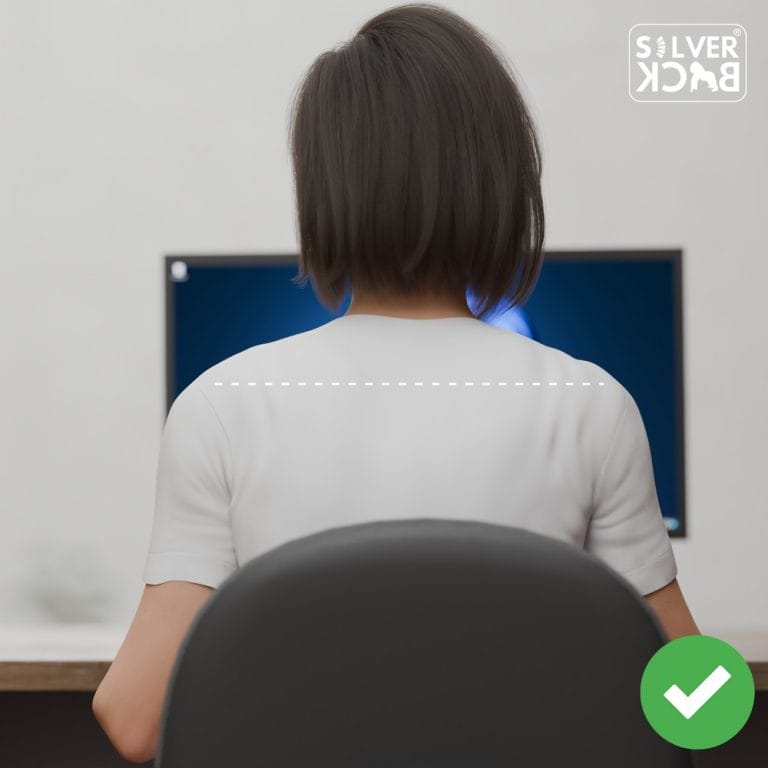
    C. Shoulder Alignment:

    Your arms and shoulders should be back and relaxed, far from your ears. Avoid sagging or curving.


    D. Hip Positioning:

    Spread your weight equally over both feet, maintaining your hips level and in line with your lower extremities.


    4. Effective Exercises to Help You Stand Up Straight

    Developing core muscles and increasing flexibility are critical: For correcting posture: To treat particular posture concerns, a variety of exercises are capable of being performed at home, at work, or in the gym.

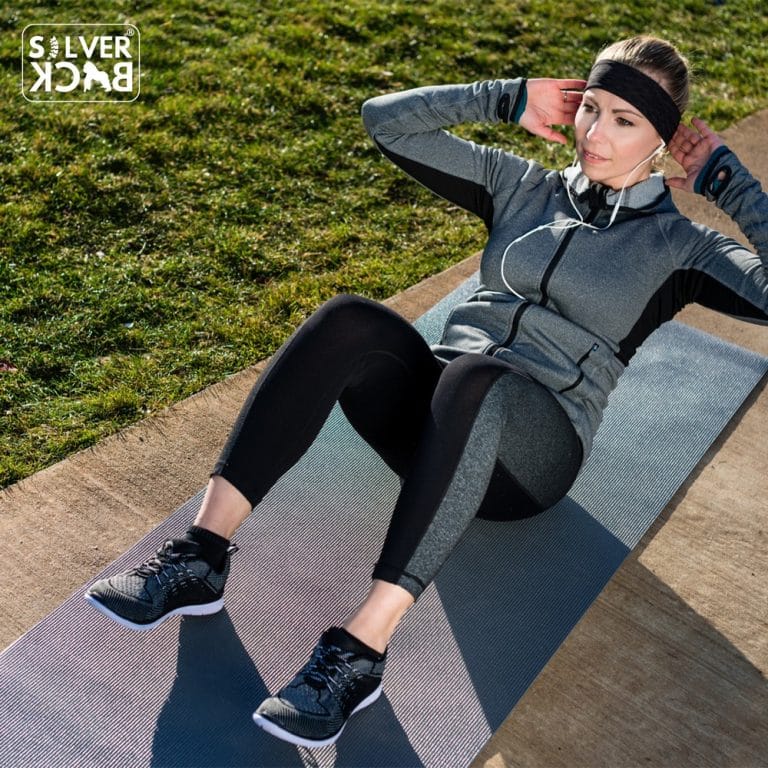
    • Partial crunches: improve core and back muscles, enhancing posture and reducing back pain.

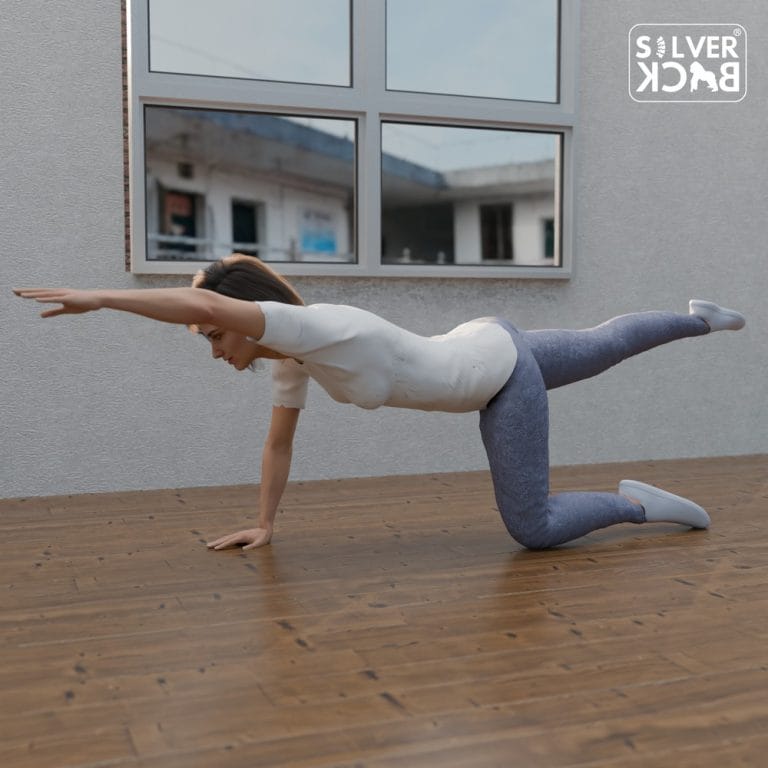
    • The bird dog exercise: helps stabilise the core and lower back muscles throughout arm and leg motions.

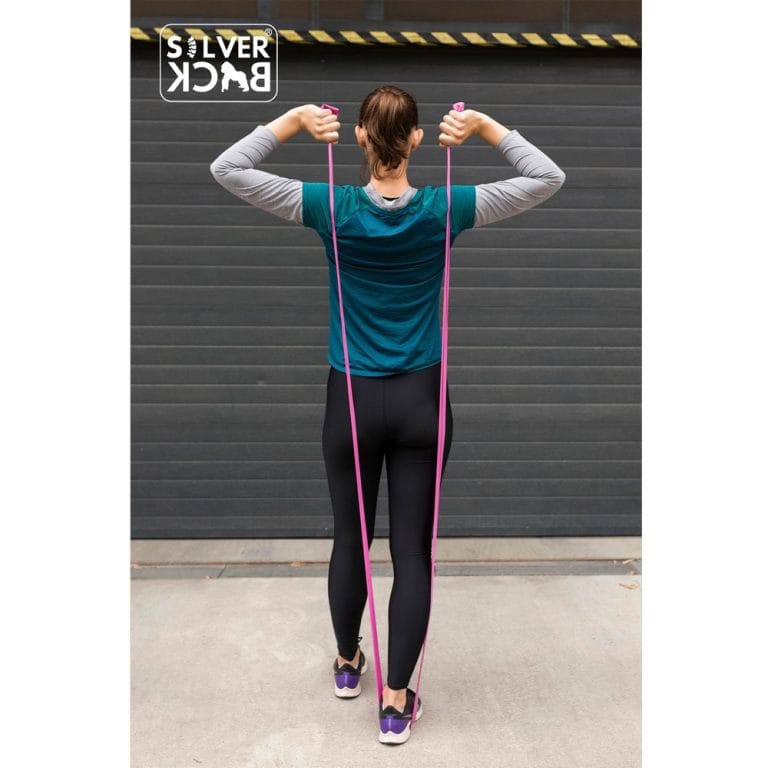
    • Standing shoulder presses: can avoid slouching and neck pain for office workers.


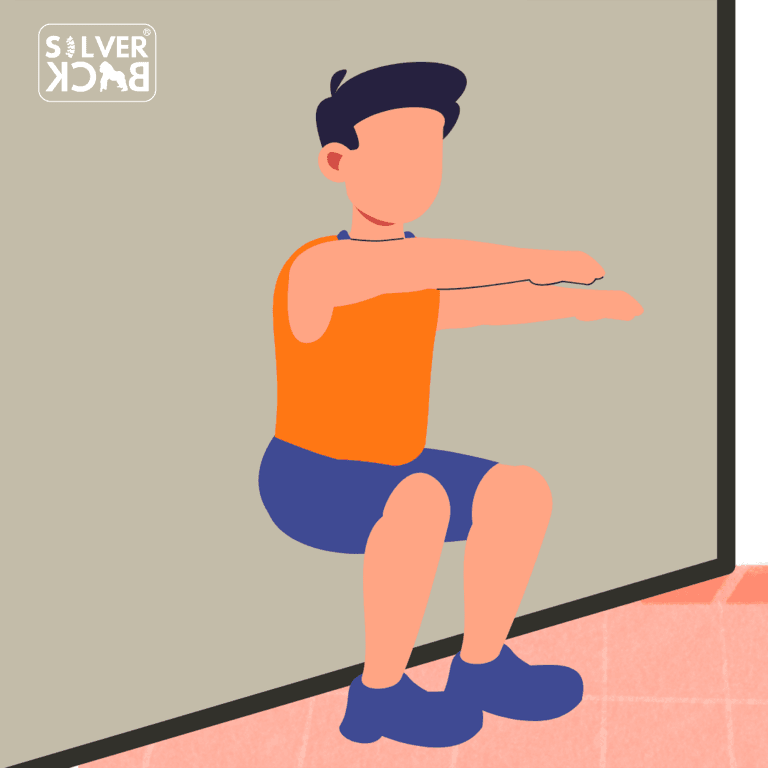
    • Wall sits: improve posture, strengthen leg muscles, and provide a refreshing respite from sitting.

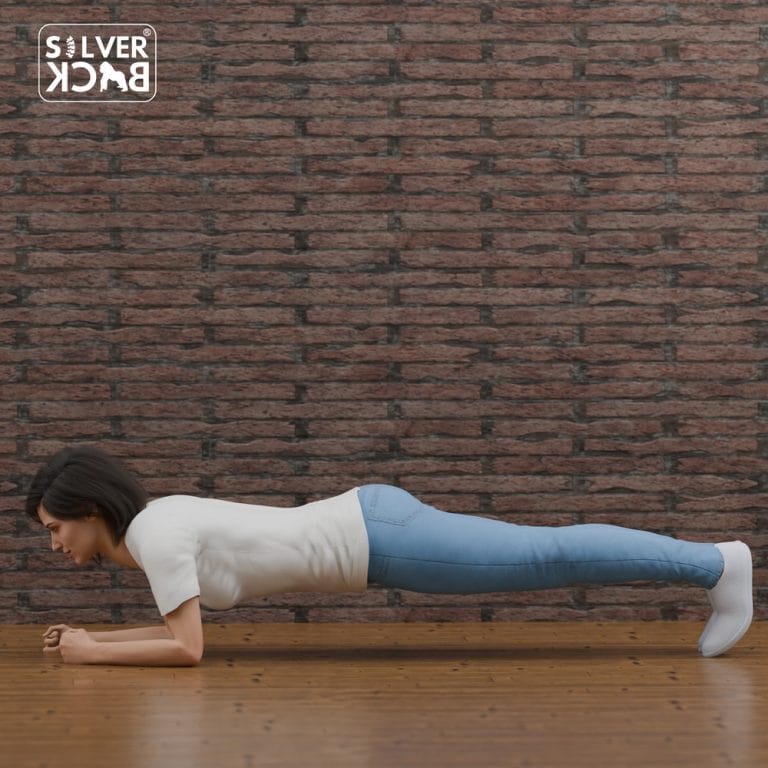
    • Planks:  strengthen all parts of the body, reducing back discomfort and improving posture.

    5. How to Stand Up Straight: Awareness and Commitment.

    Awareness is the foundation of proper posture. Here are a few ways to incorporate this awareness into your everyday routine:

    A. Mindfulness Reminders:

    Use sticky notes, alarms or phone notifications to remind yourself of checking your posture during your entire day.

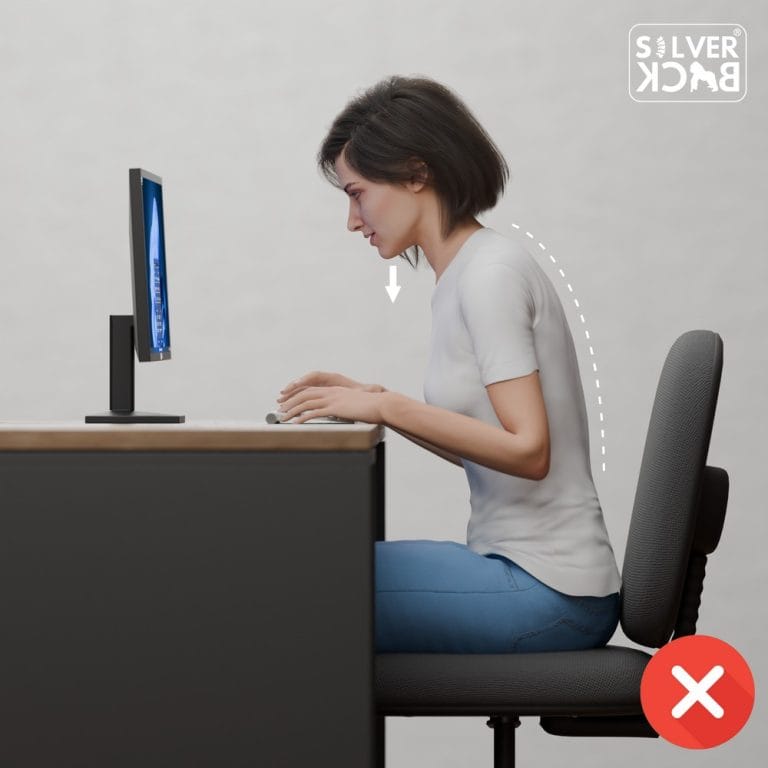
    B. Ergonomic Office:

    If you work at a desk, make sure that the environment is ergonomically structured to promote appropriate posture. Your computer monitor should be placed at eye level, your chair should support a neutral spine, and you should use an orthopedic cushion to provide additional lower back support. An orthopedic cushion helps reduce pressure on your spine, aligns your hips, and promotes better posture, making long periods of sitting more comfortable and healthier

    C. Physical Activity:

    Regular workouts, particularly strength and flexibility routines, can greatly improve entire posture.

    D. Yoga and Pilates:

    These practices emphasise posture and can help you develop body awareness and symmetry.

    Conclusion:

    Learning how to stand up straight is a gradual process, but the rewards are significant. By following these steps, performing targeted exercises, and being mindful of your posture throughout the day, you can improve your posture and experience the health benefits of standing up straight. Start today, and make standing tall a natural part of your life.

    Finally, correcting posture is a continuous process that demands awareness and continual effort. People can progressively improve their alignment and get the benefits of good posture by making tiny modifications to their everyday behaviours and integrating posture-friendly practices. This not only reduces pain, but also improves confidence and general quality of everyday life. Remember that good posture is a journey rather than an end point, and every small step contributes to a healthier, happier you.

    remember that changing your posture requires time and practice. Be conscious of how you stand and sit during the day. Regularly examine your posture and make any necessary modifications. Standing up straight will eventually become second nature.

    FAQs:

    • 1. What are the most important steps for ideal posture?

    To enhance your posture, follow these tips. Sit erect, shoulders relaxed but not slouched, knees level, and utilise your chair to support your spine. Keeping an appropriate screen viewing angle can help prevent cyber neck. Stand up straight, perform regular physical activity, and include stretching into your daily activities.

    • 2. How can I keep a straight posture when standing?

    To stand up straight, maintain your head straight and your chin pushed in, with your ears directly above the centre of your shoulders. Pull your shoulders back, knees straight, and tucked stomach in. Avoid extending your hips or buttocks outwards.

    • 3. What are the most efficient posture correction methods?

    Proper posture entails maintaining a straight back, balancing your ears, shoulders, and hips, relaxing your shoulders, spreading your weight evenly on each of your feet, and keeping your knees straight but not locked.

    • 4. What workouts will allow you to stand up straight?

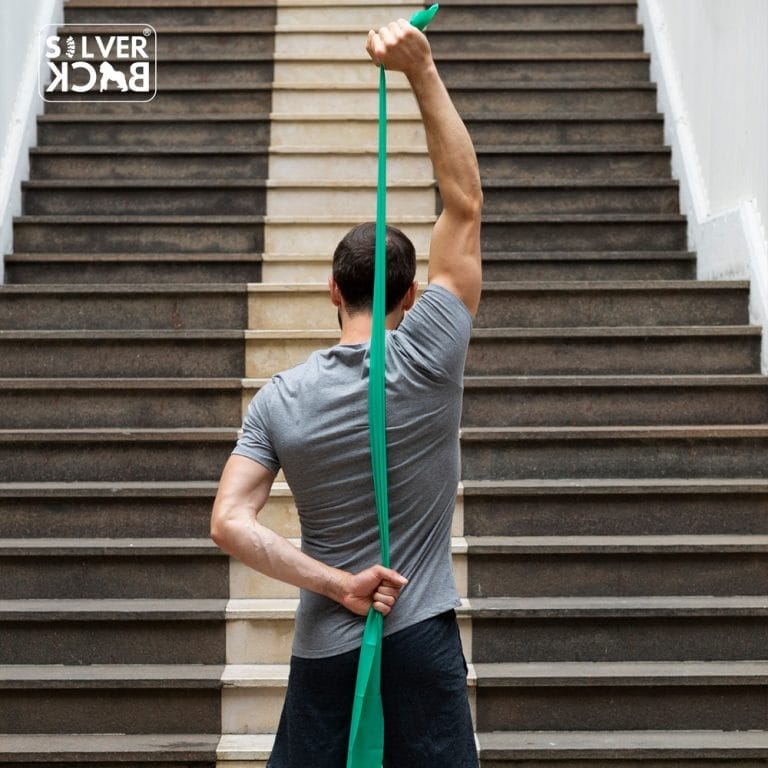
    Concentrate on workouts that will extend your chest and strengthen your back. Stretching can help release tight chest muscles and open up the chest. Strengthening the upper back muscles can also help correct posture by increasing their activity.

    • 3)https://www.carepatron.com/templates/gaenslen-tests
  • 3 tests at home to determine if your back pain is caused by si

    3 tests at home to determine if your back pain is caused by si

    Identifying the underlying cause of back discomfort can be challenging, especially when dealing with SI joint pain. This disorder affects the sacroiliac (SI) joints at the spine and pelvis, causing discomfort in the lower back, hips, and other parts of the body. Recognising SI joint pain is critical, as it is responsible for a major amount of lower back pain signs and happens frequently

    To find relief, you must seek specialised physical therapy or chiropractic care. Resolving this condition enhances physical well-being and quality of life by increasing mobility and reducing discomfort.
    This article covers three home-based evaluations tests for SI joint pain: the FABER, Thigh Thrust, and Gaenslen tests. The SI joint tests focus on particular elements of physical examination and can help identify the source of back discomfort. Understanding SI joint problems and doing basic tests can help people identify their illness and seek appropriate treatment, including physical therapy or specialised chiropractic treatments.

    Recognizing the SI joint disorders.

    SI joint disorder, also called sacroiliac joint discomfort, affects the joints that join the sacrum (the triangular bone at the lowest point of the spine) to the iliac bones (the pelvis bones). This illness can result in a variety of signs and symptoms that include:

    Low Back Pain

    A boring pulsating lower back discomfort that may range from minor to serious is a common sign of SI joint disorder. Pain is usually felt on a single side, but can occur on both.

    Radiant Pain

    The soreness may expand to the hips, thighs, and groin area. SI joint discomfort is most commonly felt in the thighs, upper back, or sideof the thigh. Once more, the pain is typically felt on a single side, but it can occur on both.

    Sciatica-like symptoms

    SI joint disorders can induce sciatica-like symptoms, including hot, severe, and stabbing pain in the buttocks, backs of the thighs, as well as tingling and numbness. But the pain rarely goes beyond the level of the knee.

    The stiffness and decreased range of motion

    People with SI joint disorder may suffer stiffness and limited range of motion in the lower back, hips, pelvic region, and groyne, making actions such as going up staircases or bending or sitting at the waistline hard.

    Pain that has become more severe

    Climbing stairs, sprinting or jogging, and sleeping or putting weight on one side can all cause soreness in the sacroiliac joint.

    Instabilities

    In some situations, SI joint disorders can produce instability in the pelvic region and lower back, giving the sensation that the pelvic is going to buckle or break up when walking, standing, or transitioning from standing to sitting.

    Inflammatory (Sacroiliitis)

    Sacroiliac joint deterioration is frequently accompanied by inflammation, sometimes known as sacroiliitis. This disorder may be the main cause of pain, stiffness, and various other symptoms connected to SI joint disorder.

    How to Complete the FABER Test at Home

    What is The FABER? (Flexion, Abduction, and External Rotate) test is also referred to as Patrick’s test, is a pain provoking test used to evaluate hip joint disorders caused by connective tissues and sacroiliac joint (SIJ) illness.

    Essential Equipment

    there are no specific equipment required for conduct the FABER test at home. All you need is a flat, comfy platform to lie down on, like your bed or a mat for yoga.

    Step by step Instructions

    there are no specific equipment required for conduct the FABER test at home. All you need is a flat, comfy platform to lie down on, like your bed or a mat for yoga.

    • Relax on your back on a flat platform.
    • Flex, abduct, and then externally twist the hip on the side you are interested in testing. Pull your knee to your chest and establish the lateral side of your ankle on the other thigh, slightly above your knee. The position described above is similar to sitting with one leg crossing over the other.
    • Rest your leg and let it gradually drop downwards. If this is not helping the symptoms, apply modest downward force to the knee until you experience resistance or stiffness.
    • Make a note of your facial movements and where you feel hurt or discomfort.
    • Restore your leg to the beginning position, and repeat the test on the opposite side if needed.

    Results Analysis

    • A positive result on the FABER test indicates that you are experiencing pain or discomfort in the hip, groyne, buttock, SIJ, or lumbar spine area throughout the test.
    • The result of a negative FABER test indicates that you did not feel any pain or discomfort during the exam.
    • Take careful attention to any imbalance in the range of motion among the two sides, since this could be a sign of possible pathology.

    It is critical to understand that the FABER test is a tool for screening and shouldn’t be implemented as an independent diagnosis procedure. A detailed medical assessment, including a medical history and a physical exam, is required to accurately diagnose and figure out the origin of the symptoms you are experiencing.

    How to Complete the Thigh Thrust Test at Home

    The Thigh Thrust Test, also referred for as its Posterior Shear Test, is a stimulation test designed to identify sacroiliac joint (SIJ) disease.

    Needed Equipment

    There is no specific equipment needed for conduct the Thigh Thrust Test at home. All you require is a flat, comfy place to lie down on, such as your bed or the practice mat of yoga.

    Step by step Instructions

    • Relax on your back (supine) on a flat surface.
    • The person taking the exam (or you, if you are completing the test yourself) will be standing on the healthy side.
    • Flex the leg on the affected side (the side with pain) to about 90° (degrees) of flexion at the hip and slight adduction.
    • Position a single hand on the sacrum, {the triangular bone at the base of the spine}.
    • Place longitudinal pressure to the person’s femur (thigh bone), generating a pulling force at the SI joint.
    • Use 3 to 6 high-velocity pushes and consistently increase the pressure.

    Results Analysis

    • A positive result on the Thigh Thrust Test indicates that the person’s typical pain in the SI joint has been reproduced.
    • A result that is negative indicates that no pain or discomfort occurred throughout the test.
    • It is critical to remember that no single physical exam technique is diagnostic on alone. A reliable diagnosis relies on a mix of tests, a complete history, and radiology examination.

    How to Complete the Gaenslen Test At Home

    Needed Equipment

    There are no specific equipment needed for conduct the Gaenslen Test at home. All you require is a flat, comfy platform to lie down on, like an examination table, bed, or meditation mat.

    Step by step Instructions

    • Relax on your back on a flat platform on the outer edge of a table or bed, with your legs completely stretched.
    • The person taking the test (or you if self-testing) will be holding your lower leg and ankle in one hand and the upper leg and knee with the other.
    • The leg you are using will be gently raised and bent towards your chest. You will be advised to maintain this bent position.
    • The person conducting the test will then completely stretch the opposite leg across the surface.
    • The person conducting the examination will apply downward pressure to the sacrum, {the triangle bone at the base of the spine}, while you lean towards the extended leg. This action causes tension in the lower back.
    • Conduct the test on the opposite leg for comparisons.

    Results Analysis

    • The person conducting the test should note the location and degree of any pain or discomfort you feel during the examination.
    • A positive result on the Gaenslen Test indicates pain or discomfort in the lower back, sacroiliac joint (SIJ), or other locations related to the symptoms you are experiencing.
    • It is critical to remember that no single physical exam technique is diagnostic on alone. A precise diagnosis relies on a mix of testing, medical history, and imaging.

    The Gaenslen Test, a test to diagnose for lower back pain and spinal disorders, ought to only be administered by licenced medical experts. Overuse of force or poor technique might injure the spine or aggravate already existing issues.

    This article highlights the need of precise evaluation and testing for sacroiliac (SI) joint disorder, an increasingly common cause of back discomfort. By explaining the FABER, Thigh Thrust, and Gaenslen tests, readers become more familiar with the symptoms they experience and the underlying reason of their suffering. These understandings can help people find efficient therapies such as physical therapy, chiropractic care, or medical consultations, leading to increased physical health and better quality of life.

    A precise diagnosis is crucial for managing SI joint discomfort effectively. Including diagnostic procedures into the initial evaluation of back pain allows for better collaboration between patients and healthcare professionals to create a personalised treatment strategy. Self-administration tests can be helpful, but a thorough examination by a skilled medical practitioner is necessary to verify the medical condition and decide the best treatment plan. Our goal is to improve the quality of life for people suffering from SI joint disorder by not only relieving pain but also restoring mobility.

    FAQ’S

    • 1. What types of tests can help identify whether my back pain is caused by the SI joint or not? To determine if your back discomfort is caused by the sacroiliac (SI) joint, your physician may do the Fortin Finger Test. This involves indicating the specific area of pain. Imaging studies including X-rays, CT scans, and MRIs can also help diagnose SI joint problems.
    • 2. By what means can I know if my SI joint is the origin of my suffering? SI joint discomfort may appear as lower back pain, numbness, tingling, or weakness in the lower limbs. Additional Signs can also consist of pelvic or buttock pain, hip or groyne pain, leg weakness (collapse or breaking way), change in sleeping habits, and trouble sitting for long periods.

    References:

    • 1) https://www.physiotutors.com/wiki/thigh-thrust-test/
    • 2) https://si-bone.co.uk/patients/si-joint-diagnosis
    • 3)https://www.carepatron.com/templates/gaenslen-tests
  • Identifying Early Symptoms of Back Pain Red Flags: When to Get Emergency Medical Attention

    Identifying Early Symptoms of Back Pain Red Flags: When to Get Emergency Medical Attention

    A common condition that millions of individuals experience globally is pain in their backs. Some symptoms can point to more serious underlying illnesses, even though the majority of instances are benign and treatable with rest and prescription medications. It’s critical to identify these “red flags” in order to seek early medical attention and prevent potentially serious health consequences. This blog post will discuss the main Red flags of back pain and emphasise the help that ergonomic products—like those offered by Silver Back—can bring in both avoiding and treating back pain.

    Most Common Causes for Back Pain

    When discussing the red flags, it’s critical that we understand the most common causes of back pain. This includes:

    • Muscle strain: Frequently brought on by unexpected movements, hard lifting, or bad posture.
    • Herniated Discs: Pain and irritation to nerves may result from the soft tissue inside a disc pushing out.
    • Arthritis: Because osteoarthritis causes joint degradation, it can cause lower back pain.
    • Skeletal Irregularities: Chronic back pain can be caused by conditions such as scoliosis.

    Even though these illnesses are usually treatable, some symptoms need to be seen by a doctor right away.

    Red Flags for Back Pain

    Although back pain is not often mentioned as a prominent symptom of IBS, there’s growing proof showing a link. Several processes could explain why people with IBS may have back pain.

    1.Intense and Continuous Pain:

    Pain that is severe does not get better with rest or medicine is one of the most serious red flags. This kind of pain may be a sign of more serious illnesses like:

    • Fractures: Especially in those who have osteoporosis.
    • Infections: Like discitis or osteomyelitis.
    • Tumours: Serious pain can be caused by both benign and malignant tumours pressing on nerves.

    2. Symptoms related to the nervous system (Neurological symptoms)

    When neurological symptoms are present together with back pain, it may be a sign of nerve injury or compression. Important signs and symptoms consist of:

    • Tingling or numbness: Usually in your feet or legs.
    • Weakness: Other muscle weakness, such as the inability to lift the foot (foot drop).
    • Loss of Bladder or Bowel Control: This may indicate a medical emergency known as cauda equina syndrome.

    3.Temperature and Mysterious Weight Loss:

    Back discomfort combined with a long-term temperature may indicate malignancy or a serious infection. These symptoms might be caused by conditions like cancer that has spread or spinal infections, which call for an immediate medical assessment.

    4.Pain at night

    A red flag may be pain that keeps you awake at night or is worse when you’re resting down. This kind of discomfort may suggest:

    Case Study and Findings from Research

    • Spinal tumors: As a tumor grows, it may affect the spine, resulting in pain at night.
    • Infections: Spinal infections might result in nighttime increase of chronic pain.

    5.Trauma

    Back pain must be handled seriously if there is a history of trauma, such as a fall or accident. Fractures can result from trauma, especially in people whose bones are already weak from diseases like osteoporosis.

    Silver Back Cushions: An Effective Way to Treat Back Pain

    The cushions from Silver Back are made using the most recent ergonomic design techniques to offer the best possible comfort and support. In this way, they assist:

    • Lumbar support cushions: By supporting the lower back’s natural curve, these cushions help to improve posture and lessen the pressure on the lumbar spine.
    • Seat cushions: Made to equally distribute weight, these cushions lessen the strain on the tailbone and protect the back from pain when sitting for extended periods of time.
    • Memory Foam Technology: Silver Back’s cushions high Quality memory foam, which takes on the contour of the body to provide personalised support and ease pressure areas.

    Effective Use of Silver Back Cushions

    In order to get the most out of Silver Back cushions, take into consideration these suggestions:

    • Appropriate Location: For the best support, make sure the lumbar support cushion is positioned in the small area of your back.
    • Regular Use: Whether at home, at work, or when driving, make sure you use the cushions on a regular basis.
    • Connect with Ergonomic Chairs: To achieve optimal outcomes, connect Silver Back cushions with a chair that promotes proper posture.

    In summary

    Although back pain is a frequent problem, it can be important to recognise the back pain red flags of serious illnesses that need to be treated right away. The following symptoms should be taken seriously: trauma, severe pain, neurological problems, fever, unexplained weight loss, and at night pain.

    Back pain can be prevented and relieved by including ergonomic goods like Silver Back cushions into your daily routine in addition to being aware of these symptoms. These cushions can significantly improve your level of comfort and the health of your spine by easing pressure spots and promoting the spine’s natural alignment.

    • 1.https://www.ninds.nih.gov/
    • 2.https://www.mayoclinic.org/diseases-conditions/back-pain/symptoms-causes/syc-20369906
    • 3.https://www.aans.org/
    • 4.https://www.arthritis.org/

    You can successfully manage your back pain and lead a better, more pleasant life by being proactive and knowledgeable.

  • Can IBS cause back pain? Discovering the Connections

    Can IBS cause back pain? Discovering the Connections

    irritable bowel syndrome (IBS) is a widespread gastrointestinal illness affecting millions of individuals worldwide. IBS is characterized by symptoms such as stomach pain, bloating, and changed bowel patterns, and it can have a substantial influence on a person’s quality of life. Back pain, on the other hand, is a common symptom associated with IBS yet frequently goes unnoticed. This blog post digs into the link between IBS and back pain, looking at possible reasons and offering suggestions for treatment options.

    Knowing IBS

    IBS is an operational gastrointestinal condition, which means it affects how the stomach functions but does not cause any noticeable anatomical changes. The precise root cause of IBS is undetermined, but it is thought to be a mix of issues, including:

    • Stomach-Brain Link Dysfunction: IBS may affect the nerve network between the stomach and brain, resulting in unusual stomach motility and sensibility.
    • Visceral Hypersensitivity: Individuals with IBS may experience greater discomfort and pain within the bowels.
    • Altered stomach micro biota: Abnormalities in the stomach flora may lead to IBS symptoms.
    • The genetics and the Environmental variables: IBS may be genetic and other variables as stress, food, and infections can aggravate symptoms.

    Is there a link between IBS and back pain?

    Although back pain is not often mentioned as a prominent symptom of IBS, there’s growing proof showing a link. Several processes could explain why people with IBS may have back pain.

    1.Transferred Pain:

    Pain felt at a different location than the source of the problem. The sensory nerves supplying the intestines and lower back are joined by the spinal cord. As a result, pain from the stomach can be experienced as back pain.

    2.Muscle Tension:

    Chronic stomach pain and discomfort may cause muscle tightness and twitches in the abdomen and back muscles. This may lead to back pain, especially in the lower back area.

    3.Posture-related Changes:

    IBS patients may adjust their posture to relieve gastrointestinal pain or discomfort. As time passes, these postural alterations may harm the back’s muscles and ligaments, causing pain.

    4.inflammation and immune response:

    IBS can lead to minimal inflammation and immune system dysfunction. This inflammation may impact the muscles and tissues of the back, leading to pain.

    Case Study and Findings from Research

    • A study released in the “Journal of Gastroenterology and Hepatology” indicated that those with IBS are significantly more likely to experience pain in their backs than those without IBS. The scientists speculated that the pain could be caused by pain radiating from the intestines or greater muscle tension.
    • A further study in the “World Journal of Gastroenterology” found that IBS patients with back pain had greater levels of depression and anxiety. This emphasises the significance that mental variables could play a role in feeling and management of pain.

    Handling Back Pain Linked with IBS

    Successful treatment of back pain in IBS patients involves dealing with both gastrointestinal and musculoskeletal symptoms. These are some techniques that may be useful:

    1. Dietary Modifications

    A low Fructose diet can improve IBS symptoms and lessen referred pain by limiting digestible carbs. A nutritionist can offer personalised advice.

    2. Stress management

    Stress might aggravate IBS and back pain. Awareness, meditation, and yoga are all techniques that can help you minimise stress and enhance your overall health.

    3. Physical Therapy

    A physical therapist can create a customised training plan for strengthening core muscles, enhance posture, and reduce muscle stress. They can also offer physical therapy treatments for reducing pain.

    4. Medications

    Without a prescription pain medications like paracetamol and NSAIDs can reduce back pain. Some doctors may recommend drugs to treat IBS symptoms, such as antispasmodics or small dose of antidepressants.

    5. Alternative Therapies

    Acupuncture therapies, chiropractic treatments, and massage therapy can effectively relieve back pain. These techniques can assist to relieve muscle tension and enhance blood circulation.

    6. Supportive Cushions

    Brands like Silver Back offer supportive cushions that can improve posture and relieve back discomfort. These cushions are intended to give ergonomic support and reduce pressure spots.

    The necessity of a comprehensive strategy.

    Given the complicated connection between IBS and back pain, a comprehensive approach to treatments is required. This approach should take into account the physical, psychological, and lifestyle components which lead to the symptoms. Collaboration among healthcare practitioners, such as gastroenterologists, physical therapists, and mental health professionals, can result in more complete care and better outcomes.

    Conclusion

    IBS is most commonly linked with gastrointestinal symptoms, but it can also cause back pain. Understanding the different systems underlying this connection might assist people in seeking suitable treatment and management precautions. Individuals suffering from IBS can improve their overall quality of life by treating both the intestines and the back. If you have ongoing back pain and IBS symptoms, you should speak with a healthcare practitioner to build a personalised treatment strategy.
    Additional References:


    • 1. https://onlinelibrary.wiley.com/doi/full/10.1111/j.1440-1746.2010.06536.x
    • 2. https://www.gastrojournal.org/article/S0016-5085(06)00515-4/fulltext
    • 3. https://www.gastrojournal.org/article/S0016-5085(02)80189-5/fulltext
    • 4. https://www.jmcp.org/doi/10.18553/jmcp.2004.10.4.299
    • 5. https://www.sciencedirect.com/science/article/abs/pii/S0889855310001287?via%3Dihub
  • What Is The Best Mattress Topper for Your Lower Back And Hip Pain

    What Is The Best Mattress Topper for Your Lower Back And Hip Pain

    Table of Contents:

    • Memory Foam Mattress Topper
    • Latex Mattress Topper
    • Gel-Infused Mattress Topper
    • Feather Mattress Topper
    • Wool Mattress Topper

    Are you tired of waking up with lower back and hip pain every morning?
    Finding the best mattress topper for lower back and hip pain can make a world of difference in your quality of sleep and overall comfort.
    In this guide, we will explore the top-rated mattress toppers specifically designed for lower back and hip pain, helping you achieve a restful and rejuvenating sleep experience.

    What to Look for in a Mattress Topper for Back and Hip Pain

    When shopping for a mattress topper to relieve lower back and hip pain, there are several key factors to consider:

    • Firmness: A medium-firm mattress topper for balanced support and comfort, particularly beneficial for relieving back and hip pain.
    • Material: Choose memory foam, latex, or gel-infused mattress toppers renowned for their pressure-relieving properties, enhancing overall sleep quality.
    • Thickness: Prioritize a thicker mattress topper to ensure adequate cushioning and optimal spine alignment, promoting a restorative sleep experience.
    • Cooling Features: Select a mattress topper with cooling gel or breathable materials if you tend to sleep hot, ensuring temperature regulation throughout the night.
    • Hypoallergenic: For allergy sufferers, opt for a hypoallergenic mattress topper to minimize potential irritants and create a healthier sleeping environment.

    The Top 5 Mattress Toppers for Lower Back and Hip Pain

    1. Memory Foam Mattress Topper

    Watch This Impressive Video By : @consumerreports

    Key Features :

    • Contours to your body shape, relieving pressure points.
    • Distributes weight evenly to reduce strain on your lower back and hips.
    • Provides excellent motion isolation for undisturbed sleep.

    2. Latex Mattress Topper

    Ownership Of @TheSleepDoctor

    Key Features :

    • Naturally hypoallergenic and resistant to dust mites.
    • Offers responsive support for proper spinal alignment.
    • Durable and long-lasting for years of comfort.

    3. Gel-Infused Mattress Topper

    Ownership of @Subrtex

    Key Features :

    • Regulates temperature for a cooler night’s sleep.
    • Provides plush cushioning while supporting your back and hips.
    • Reduces motion transfer for uninterrupted rest.

    4. Feather Mattress Topper

    Ownership Of @houseproduct1

    Key Features :

    • Soft and luxurious feel without sacrificing support.
    • Lightweight and breathable for a comfortable sleep environment.
    • Enhances breathability for a cool and refreshing night’s sleep.

    5. Wool Mattress Topper

    Ownership of @PlushBeds
    • Naturally moisture-wicking and temperature regulating.
    • Provides gentle cushioning for pressure relief.
    • Hypoallergenic and resistant to mold and mildew.

    Here Is Our list Of Top 5 Matress Toppers for Lower Back and Hip Pain in 2024, Ultimately

    Finding the best mattress topper for lower back and hip pain can transform your sleep experience and alleviate discomfort. Whether you prefer the contouring support of memory foam, the responsiveness of latex, or the cooling properties of gel-infused materials, there is a mattress topper to suit your needs.

    Invest in your sleep health and say goodbye to aching backs and hips with a top-rated mattress topper designed to provide the comfort and support you deserve. Wake up feeling refreshed and rejuvenated, ready to take on the day without the burden of pain and discomfort.
    Don’t let back and hip pain disrupt your sleep any longer.

  • How to Sit on Plane With Lower Back Pain

    How to Sit on Plane With Lower Back Pain

    How to Sit on a Plane with Lower Back Pain

    Tips for Sitting Comfortably on a Plane:


    • Maintain Good Posture

    • Take Breaks

    • Use Lumbar Support

    • Adjust Your Seat

    • Engage in Gentle Exercises

    • Using Orthopedic Cushions

    Traveling can be exciting, but for those suffering from lower back pain, sitting on a plane for an extended period can be a nightmare. The discomfort and stiffness that accompany long flights can make the journey unbearable. However, with the right techniques and tools, such as Getting an orthopedic cushions and memory foam cushions With Your Flight,  can alleviate lower back pain and enjoy a more comfortable flight experience.

    1. Understanding Lower Back Pain


    Lower back pain is a common issue that affects many people, especially during extended periods of sitting. For Males and Females, The discomfort is often exacerbated by inadequate lumbar support and poor posture. When sitting for long hours on a plane, the lack of proper ergonomic support can lead to increased pain and stiffness in the lower back. for a deeper understanding, you can read this article from Clevelandclinic .

    2. Tips for Sitting Comfortably on a Plane


    • Maintain Good Posture: Sit up straight, with your back against the seat and your feet flat on the floor.

    • Take Breaks: Stand up and stretch at regular intervals to relieve tension in the muscles.

    • Use Lumbar Support: Place a cushion or rolled-up towel behind your lower back to support the natural curve of your spine.

    • Adjust Your Seat: Recline your seat slightly to reduce pressure on your lower back.

    • Engage in Gentle Exercises: Perform simple stretches and exercises to keep your back muscles limber during the flight.

    3. Using Orthopedic Cushions


    Orthopaedic cushions are specifically designed to provide support and alleviate pressure on the lower back. These cushions are made with high-density foam that moulds to the shape of your body, promoting proper spinal alignment and reducing discomfort. By placing an orthopaedic cushion behind your lower back, you can maintain a neutral spine position and prevent strain on the muscles.

    In conclusion, sitting comfortably on a plane with lower back pain can be achieved by implementing a combination of techniques. First and foremost, maintaining good posture is crucial. This involves sitting up straight, with your back aligned against the seat and your feet flat on the floor. Slouching or hunching forward can exacerbate lower back pain, so it is important to be mindful of your posture throughout the flight.

  • What Causes Lower Back Pain in Females ?

    What Causes Lower Back Pain in Females ?

    What Causes Lower Back Pain in Females : 3 Possible Causes

     Causes :

    1. Muscular Strain
    2. Structural Issues
    3. Arthritis

    Lower back pain is a common issue that affects many women worldwide. It can be debilitating and significantly impact daily activities. , we will explore the various factors that contribute to lower back pain in females, providing valuable insights into prevention and treatment.

     Common Causes of Lower Back Pain in Females

     1. Muscular Strain

    Muscular strain is one of the most prevalent causes of lower back pain in women. It can result from physical activities, poor posture, or lifting heavy objects incorrectly. The muscles in the lower back can become strained, leading to discomfort and pain.

     2. Structural Issues

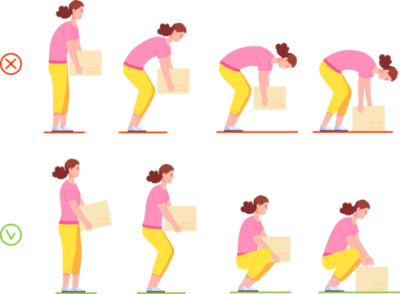
    Structural issues such as herniated discs, bulging discs, or degenerative disc disease can also contribute to lower back pain in females. These conditions can put pressure on the nerves in the spine, causing pain and discomfort.

     3. Arthritis

    Arthritis, particularly osteoarthritis, can affect the lower back and lead to pain in women. The wearing down of cartilage in the joints can result in inflammation and discomfort.

     Risk Factors for Lower Back Pain in Women

     1. Pregnancy

    Pregnancy can put additional strain on the lower back due to the weight gain and changes in posture. This can lead to increased risk of experiencing lower back pain during and after pregnancy.

     2. Posture

    Poor posture, whether when sitting, standing, or moving, can contribute to lower back pain in females. Maintaining good posture can help alleviate discomfort and prevent future issues.

     3. Lack of Exercise

    A sedentary lifestyle and lack of exercise can weaken the muscles in the lower back, making them more susceptible to injury and pain.Regular physical activity can help strengthen the muscles and reduce the risk of lower back pain.

     Prevention and Treatment Options

     1. Exercise

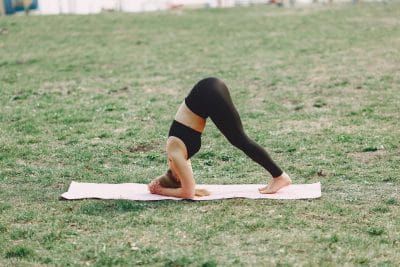
    Engaging in regular exercise, particularly strengthening and stretching exercises, can help prevent lower back pain in females. Exercises that target the core and lower back muscles can improve strength and flexibility.

    2. Maintain a Healthy Weight

    Maintaining a healthy weight can reduce strain on the lower back and decrease the risk of developing pain. Eating a balanced diet and staying active can help manage weight and prevent issues.

     3. Proper Lifting Techniques

    Using proper lifting techniques when lifting heavy objects can prevent strain and injury to the lower back. It is essential to bend the knees, keep the back straight, and lift with the legs to avoid putting unnecessary pressure on the spine.